If you live in a rural area, choosing the right method for mounting Starlink on metal roofs is crucial for a secure and leak-proof installation. Chances are your home, shop, or barn features a metal roof. Standing seam panels, corrugated tin, ribbed steel, and R-panels—these roofs are incredibly durable, energy-efficient, and weather-resistant, which is exactly why they are the standard in the countryside.
But when it comes time to mount a Starlink dish, that same tough metal surface raises a few important questions: Do I drill into it? Can I clamp onto the seams? What happens if water gets in? Will the wind rip it off?
At Installers of Starlink, we provide Starlink installation services across all 50 states, and metal roof setups are among the most common jobs we handle in rural markets. In this comprehensive guide, we are breaking down every viable mounting method, how to identify your roof type, safety tips for working at heights, cable routing best practices, and the absolute do’s and don’ts that separate a clean, leak-proof installation from one that causes massive headaches down the road.
Why Metal Roofs Require Special Attention
Metal roofing is not like traditional asphalt shingles. There are no soft layers to seamlessly compress a flashing into, and the natural expansion and contraction of metal panels caused by daily temperature changes can quickly work sealants loose over time if the wrong products or techniques are used.
Furthermore, simply driving a screw into the thin sheet metal offers zero structural integrity. Without hitting a rafter or purlin, a strong gust of wind will easily rip a dish right out of the metal, leaving you with a damaged roof and a broken Starlink.
On the flip side, metal roofs are exceptionally strong and long-lasting. If you choose the right mounting hardware for your specific panel type, you can often secure your dish without ever breaking the surface of the roof at all.
The Pros and Cons of a Metal Roof Installation
The Pros:
Structural strength: When anchored to the purlins beneath the metal, the mounting point is rock-solid.
Longevity match: A properly installed Starlink mount on a metal roof can last decades alongside the roof itself. You don’t have to worry about replacing asphalt shingles around the dish in 15 years.
Non-penetrating options: Certain metal roofs allow for heavy-duty clamping systems that require zero drilling.
The Cons:
Galvanic corrosion risk: If dissimilar metals contact each other—say, a bare aluminum mount base against a galvanized steel roof panel—you can trigger galvanic corrosion over time. Isolating metals with neoprene pads or EPDM gaskets is essential.
Slippery and dangerous: Bare metal is incredibly slick, making DIY installations much more hazardous than working on standard shingles.
Cable routing challenges: You cannot easily tuck a cable under a metal panel like you can with a shingle, meaning your exterior cable management must be flawless.
Identify Your Metal Roof Type
Before you can choose the best Starlink metal roof mount, you must know exactly what kind of metal roof you are working with. The physical profile of your roof entirely dictates your hardware options.
Standing Seam: These roofs feature flat panels with vertical, raised ribs (seams) that lock together. There are no exposed screws or fasteners holding the panels down. This is the ideal roof for non-penetrating clamps.
Exposed Fastener (Corrugated / R-Panel / Ribbed): These panels overlap and are screwed directly into the roof decking or purlins. You will visibly see the rows of screws with rubber washers. Clamps will not work here; you must use penetrating mounts, ridge mounts, or avoid the roof altogether.
The Best Mounting Options for Metal Roofs
Here are the five best ways to mount a Starlink dish to a metal structure, ranging from completely non-penetrating clamps to secure wall mounts.
1. Standing Seam Clamps (Non-Penetrating — Our Top Recommendation)
If your metal roof has a standing seam profile, you are in luck. This is the cleanest, most structurally sound mounting method available for metal roofs, and it requires zero holes.
How it works: Specialized seam clamps (such as those made by S-5!) bolt directly onto the raised seam of the panel. These clamps use set screws to grip the seam with incredible holding strength—often rated for wind loads well over 100 mph—without piercing the metal. A mast adapter is then attached to the clamps, and the Starlink dish clicks right in.
Pros: Absolutely no penetrations, no sealant required, zero risk of leaks, and the clamp can be easily repositioned.
Cons: Only works on standing seam profiles. It will not work on corrugated or ribbed metal roofs.
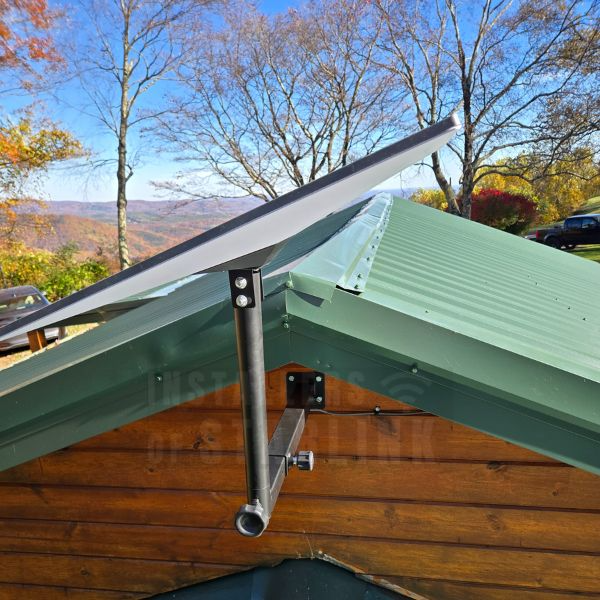
2. Wall Mount / Fascia Mount (Often the Smartest Choice)
Don’t overlook the walls! In many cases, bypassing the best Starlink metal roof mount options altogether in favor of an exterior wall, gable end, or fascia board provides sufficient sky clearance without ever touching the metal roof.
How it works: A heavy-duty J-mount or Starlink Long Wall Mount is lagged directly into the structural framing of your home’s exterior wall or the fascia board just below the roofline.
Pros: No roof work required, much safer to install, incredibly easy to service.
Cons: May not achieve sufficient height clearance if you are surrounded by tall, dense trees.
3. Ridge Mount (Non-Penetrating, Span-Type)
If you have an exposed fastener roof but still want to avoid drilling new holes into the main panels, a ridge mount that straddles the peak of the roof is an excellent choice.
How it works: Two metal plates span the ridge cap and use opposing tension against both roof faces to hold a mast in place.
Pros: Highly stable and positions the dish at the absolute highest point of the roof.
Cons: Not all ridge profiles are compatible. Requires careful installation to avoid crushing metal ridge cap panels.
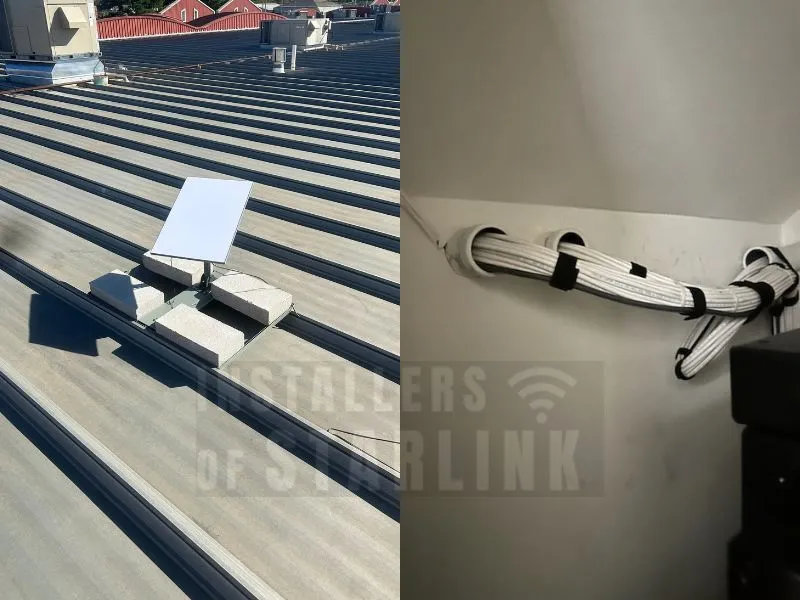
4. Non-Penetrating Ballast Mount (Flat or Low-Slope Roofs)
For flat or very low-pitch metal roofs—common on commercial buildings, shipping containers, and workshops—a non-penetrating ballast mount is the standard.
How it works: A heavy steel frame sits directly on the metal roof surface, protected by a thick rubber pad. Standard concrete blocks are added to the base to meet regional wind load requirements.
Pros: Completely non-penetrating, no sealant needed, fully removable.
Cons: Extremely heavy. You must verify that your roof structure can support the added point-load weight.
5. Through-Roof Penetrating Mount (When Done Right)
Sometimes, particularly on corrugated roofs where clamps are impossible, a penetrating mount is the only option. When done correctly, this is perfectly safe. When done poorly, it will leak.
How it works: A mount is secured by driving structural lag screws through the high ribs of the metal panel and deep into the wooden rafters or purlins below. The penetration is then waterproofed using specialized metal roofing sealants.
Pros: Rock-solid stability. Works with any metal roof profile.
Cable Management – Routing, Clips, and Lengths
Getting the dish securely on the roof is only half the battle; routing the cable safely into your home so it looks clean and functions perfectly is just as important.
The Starlink Standard 4X Cable Length
- Before planning your installation, you need to know how much cable you have to work with. The Standard Starlink 4X unit (Gen 3) includes a 15-meter (49.2-foot) cable straight out of the box.
- While 49 feet is sufficient for standard residential installations where the router is directly inside the adjacent wall, it is often not enough for larger commercial properties, tall barns, or complex routing paths. If you need more length, 45-meter (147-foot) cables are available in the Starlink shop. Always measure your planned route before you begin drilling.
Cable Clips: How Many Do You Need?
- Your Starlink cable must be supported along its entire run. Unsupported cables will sag, flap against the metal siding in the wind, and eventually fail at the connectors due to repeated flex stress.
Use outdoor-rated, UV-resistant cable clips (screw-mount or heavy-duty exterior adhesive). Standard indoor plastic clips will become brittle and snap within a year of sun exposure.
Spacing: Place one clip every 12 inches (1 foot) on vertical runs, and every 18 to 24 inches on horizontal runs.
For a typical 20-foot exterior run, plan to use at least 15 to 20 clips to keep it tight and professional.
The Drip Loop
- Never run a cable completely straight into a wall or roof penetration. Always create a drip loop—a downward U-shape curve in the cable just before the entry point. Gravity will force rainwater to drip off the bottom of the loop rather than allowing it to travel down the cable and straight into your drywall.
The Metal Roof Sealant Guide
Using the wrong sealant on a metal roof guarantees a leak. Metal expands in the summer sun and contracts in the winter cold. You need a sealant that remains permanently flexible.
For Roof Penetrations: Do not use standard hardware store silicone. Use a self-leveling polyurethane or butyl rubber lap sealant (such as Geocel 2300, Loctite PL Roofing, or Sika Multiseal). For penetrating mounts, place a square of double-sided Butyl Tape underneath the mount base before screwing it down, then cap the screw heads with the polyurethane sealant.
For Wall Penetrations: A high-quality, exterior-grade, paintable silicone caulk (like OSI QUAD Max or GE Silicone 2+) is perfect for sealing the hole where the cable enters the siding of your home.
Never Use: Standard interior latex caulk, spray foam as a primary water barrier, or duct tape.
Safety First – Working on a Metal Roof
Metal roofs are incredibly slippery. Even morning dew, frost, or a light layer of pollen can turn a gently sloped metal roof into an ice rink. Falls from ladders are one of the leading causes of serious injury in home improvement.
Ladder Safety:
Use a Type I or Type IA ladder rated for at least 250–300 lbs.
Follow the 4:1 rule: The base of the ladder should be 1 foot away from the wall for every 4 feet of vertical height.
Secure the top of the ladder. Metal siding is slick; use a ladder standoff or tie-off to prevent lateral sliding.
Never carry the dish or heavy tools in your hands while climbing. Keep three points of contact and use a tool belt or a rope hoist.
On the Roof:
Wear the right shoes: Standard sneakers will not grip. Wear soft, rubber-soled, non-slip roofing boots or skate shoes.
Fall Protection: If you are working on a pitched metal roof, a personal fall arrest system (safety harness and roof anchor) is non-negotiable.
Step Carefully: On corrugated roofs, walk on the flats (the valleys) near the purlin lines where the screws are. Stepping on unsupported high ribs will permanently dent the metal.
Installation Do's and Don'ts
DO’s
DO use the Starlink app first. Scan the sky from your exact intended mount location to check for obstructions before drilling any holes or buying hardware.
DO map your cable path. Plan exactly how the cable will get from the roof to your indoor router to minimize the amount of exposed exterior cable.
DO properly ground your mount. Metal roofs attract static electricity. Ensure your mast is properly grounded to your home’s grounding rod using solid copper wire.
DON’Ts
DON’T cut the Starlink cable. The Gen 3 cables feature proprietary shielded SPX RJ45 connectors with water seals. Cutting and splicing them voids your warranty and almost always results in voltage drops that cause system reboots.
DON’T ignore the cable bend radius. Bending the cable at a sharp 90-degree angle will crush the internal copper pairs. Use gentle, sweeping curves.
DON’T mount directly above a chimney. The smoke, soot, and extreme heat will quickly degrade the dish plastics and block your satellite signal.
Leave It to our Professionals Technicians
Mounting Starlink on a metal roof is entirely possible, but it demands the right structural hardware, the correct flexible sealants, and strict safety practices. One misstep can lead to a severe fall, or a botched seal that causes thousands of dollars in water damage to your ceiling.
At Installers of Starlink (a DBA of Starlink Installation Techs LLC), our certified, fully insured technicians handle complex metal roof installations every single day. We service residential homes, commercial properties, mobile RVs, and marine vessels across all 50 states. We know exactly which clamps fit your standing seam profile, how to locate your structural purlins safely, and how to route your cables flawlessly.
The best part? We pride ourselves on speed and efficiency. Our nationwide average scheduling time is just 3 days, and the installation itself is typically completed in 3 hours or less. You don’t have to risk climbing a slippery roof or guessing which sealant to buy. We handle it all, backed by a workmanship guarantee.
Curious about Starlink signal quality in remote or rural areas? Read our article about Starlink in rural areas and what to expect.
Ready to get your best Starlink metal roof mount scheduled? Call us at (877) 309-1050, fill out our free quote form or reach us via live chat—and expect a response in about 5 minutes. We’re available Monday through Friday, 6:00 AM to 11:00 PM, and weekends from 6:00 AM to 9:00 PM.
Connectivity News & Updates
T-Mobile Starlink Business Internet: SuperBroadband Explained
T-Mobile Starlink business internet officially became a real product on...

Starlink in Rural Areas – What to Expect and How We Make It Reliable
For decades, living in the country meant making a difficult...
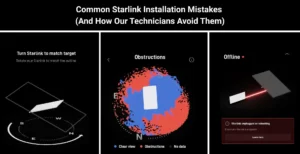
Common Starlink Installation Mistakes (And How Our Technicians Avoid Them)
When you receive your Starlink kit, the “plug-and-play” marketing makes...

Starlink on Metal Roofs – Best Mounting Methods That Actually Work
If you live in a rural area, choosing the right...