Wondering how to prepare your roof for a Starlink installation? So you’ve ordered your Starlink kit — great move. Making the switch to a low Earth orbit satellite network is one of the most exciting connectivity upgrades you can make, especially if you’ve been stuck with unreliable legacy internet or slow DSL. But before your sleek, flat-panel dish goes up, there’s a crucial conversation that doesn’t happen enough: is your roof actually ready for it?
At Installers of Starlink (a DBA of Starlink Installation Techs LLC), we’ve completed over 3,000 Starlink installations nationwide, and one of the most common surprises customers encounter is that the mounting process requires significant planning. It is never as simple as just “sticking it up there.”
The good news? When Starlink installation roof preparation is done right, a roof-mounted Starlink dish is clean, secure, weather-tight, and built to last through the harshest seasons. Here’s exactly what goes into a proper roof preparation—and what our expert technicians evaluate before the first fastener ever touches your home.
Why Roof Preparation Matters
Starlink’s flat-panel dish (specifically the Standard Gen 3 / Standard 4X unit) is a precision piece of hardware. It features an internal motor that autonomously adjusts its tilt to track satellites moving rapidly across the sky. To do its job, it needs a 100% clear, unobstructed view, a structurally sound mounting surface, and a properly sealed cable pathway into your home.
Skip any one of those steps and you’re looking at micro-dropouts during video calls, water intrusion in your attic, or a mount that fails under wind or snow load. Thorough preparation mitigates all of these risks. We assess the entire structural ecosystem of your roof before we begin any physical work.
Roof Pitch: Does Your Angle Work?
Roof pitch (the angle or steepness of your roof) is the first thing we look at when evaluating a potential mounting location. Starlink’s dish self-levels and tilts, so moderate pitches (typically 4:12 to 9:12) are usually no problem—the mount’s articulating mast compensates for the slope.
However, very steep pitches (12:12 and above) present two distinct challenges. First, they can limit the physical range of motion for the dish’s motors. Second, they raise significant safety and access concerns. On extremely steep roofs, our technicians may recommend a fascia board mount, a wall mount just below the roofline, or a ground/pole mount. This keeps the dish high enough for sky clearance while avoiding the severe, dangerous surface entirely.
Conversely, low-pitch and flat roofs (under 3:12) open up another excellent option: non-penetrating roof mounts. These utilize heavy ballast blocks that sit on thick rubber protection pads on the roof surface, holding the dish assembly in place through weight alone. Because there is zero drilling required, these are incredibly popular for commercial flat roofs and membrane surfaces.
Shingle Type and Condition: What We're Looking For
Not all roofing materials are created equal, and their age and condition matter just as much as their type. We adapt our hardware to match your home’s specific defense barrier.

Asphalt and Architectural Shingles: These are the most common and generally the easiest to work with. Standard lag bolts seat cleanly into the wooden decking or trusses beneath them, and specialized self-leveling roofing sealant bonds perfectly to asphalt surfaces. However, we always inspect for cracked, curling, brittle, or missing shingles around the proposed mount area before drilling. Installing a heavy mount over compromised, rotting, or aging shingles just invites leaks and eventual tear-out.
Tile Roofs (Clay, Concrete, or Slate): These require extreme care. Tiles are notoriously brittle and can easily shatter if a technician steps or kneels without proper weight displacement. For these, we use tile-specific mounting brackets designed to safely bridge the tile surface and anchor directly into the structural rafter below, keeping the delicate tile itself load-free. If a tile roof is too fragile, we immediately pivot to an eave or gable mount.
Wood Shake Shingles: Older wood shakes can be fragile and prone to hidden moisture rot. We probe the area for soft spots before committing to a location. If the decking beneath is solid, a wood shake installation is workable. If not, an alternative location is mandatory.
Rubber/TPO and Built-up Flat Roofs: As mentioned, these pair best with non-penetrating ballast mounts. If penetration is absolutely necessary to hit an underlying truss, we use appropriate flashing boots and specialized membrane-compatible sealants—never standard silicone, which will fail on a TPO roof.
Metal Roofs: Pros, Cons, and Your Best Mounting Options
Metal roofs are increasingly common due to their incredible lifespan—and they present a unique set of opportunities and challenges for a Starlink roof mount. Here is an honest breakdown of what to expect.
The Pros of Metal Roofs for Starlink
- Metal roofs are exceptionally durable, often lasting 40 to 70 years, meaning the structural integrity of the mounting surface is rarely a concern. Standing seam metal panels and exposed-fastener metal roofs also offer dedicated mounting systems that, when used correctly, are among the most secure and weathertight options available in the industry. There are no shingles to displace, no granule loss to worry about, and the hard surfaces bond exceptionally well with the right industrial sealants.
The Cons of Metal Roofs for Starlink
- The challenges are highly practical. Metal roofs are dangerously slippery, especially when wet or frost-covered. Ladder and on-roof safety protocols become critical life-saving measures. Standard wood-shingle hardware is completely useless here; you need metal-roof-specific clamps or brackets. Furthermore, drilling into a metal panel without the proper backing plate and sealant is a guaranteed recipe for rust and leaks. On standing seam roofs, drilling into the seam itself (rather than using a friction clamp) compromises the panel’s weatherproofing and can void the manufacturer’s warranty.
Metal Roof Mounting Options:
Standing Seam Clamps (S-5! Clamps): The undisputed gold standard for standing seam metal roofs. These heavy-duty clamps attach directly to the raised seam of the panel using specialized set screws—requiring absolutely zero roof penetration. They are immensely strong, removable, and completely weathertight.
Through-Panel Mounts with Backing Plates: On exposed-fastener metal roofs (like corrugated or R-panel), drilling is often unavoidable. When we drill, we use a backing plate on the underside of the panel to spread the load and prevent pull-through. We then seal the penetration with a butyl-backed flashing plate and self-leveling metal roof sealant compatible with the panel’s thermal expansion properties.
Fascia and Gable-End Mounts: On many metal-roofed homes, a fascia board or gable-end wall mount is the smartest alternative to going on the roof at all. The dish still gets the necessary elevation, the mount is accessible without navigating slick metal, and roof penetrations are entirely avoided
Snow Load: A Factor That's Often Ignored Until It Isn't
If you are located in the Upper Midwest (like Wisconsin), New England (like Vermont), the Rockies, or anywhere that sees significant annual snowfall, heavy snow load must factor into your mount decision. The Standard Gen 3 dish has a built-in snow melt heater that handles accumulation on the dish face—but it cannot magically shed snow from a poorly positioned mount that is buried under a three-foot drift.
Here is what proper Starlink installation roof preparation looks like for winter climates:
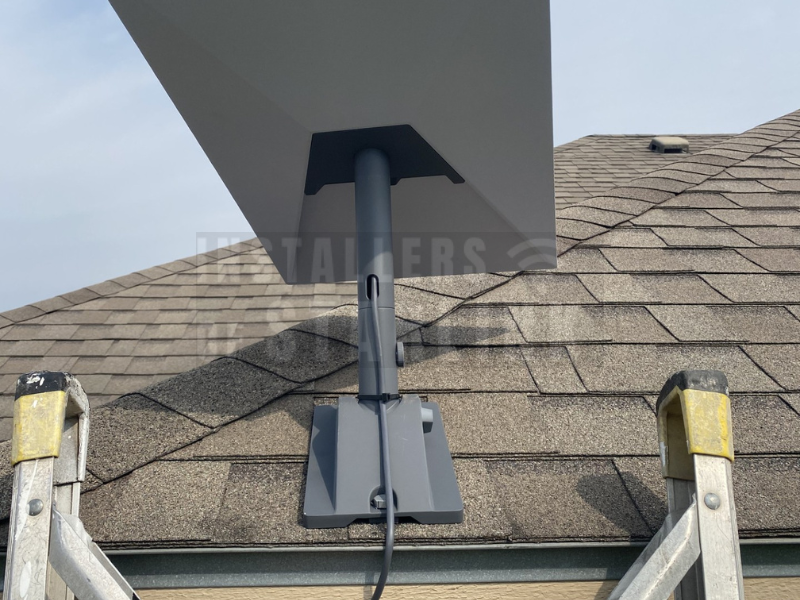
Mount Height Above the Roof Surface: A dish mounted too close to the roof deck can get buried in accumulated snow around its base. This strains the mast, physically blocks the dish’s range of motion, and causes destructive ice dams to form around the mount hardware. We aim for enough extended mast height to keep the dish base well above the expected annual snow depth.
Roof Pitch and Snow Shedding: Steeper pitches naturally avalanche snow faster. While this is an advantage for the roof, sliding heavy snow can easily rip a low-mounted dish right off the mast. On steep metal roofs, we purposefully position the dish above or far to the side of the primary slide zones.
Ladder Safety and Roof Access Best Practices
This section is not optional reading. Every year, well-meaning property owners are seriously injured attempting satellite dish installations without proper safety precautions. Whether you’re doing preliminary prep work or a technician is completing the install, these practices are non-negotiable.
Use the Right Ladder for the Height: An extension ladder must extend at least three feet above the roofline edge to provide a safe handhold for transitioning onto the roof. Fiberglass ladders are strictly preferred over aluminum when working anywhere near electrical lines.
Follow the 4-to-1 Rule: For every four feet of height, the base of the ladder must be placed one foot away from the wall. A ladder leaning too steeply will tip backward; one leaning too shallow will slide out from the bottom.
Always Have a Spotter: Someone should be footing or stabilizing the base of the ladder at all times when climbing, especially when carrying a $600 piece of hardware up the rungs.
Never Work on a Wet or Icy Roof: Metal roofs in particular become ice rinks when wet. We strictly reschedule installations in rain, high winds, or icy conditions.
Use a Roofing Harness on Steep Pitches: On pitches above 6:12, a fall arrest harness anchored to a commercial roof anchor or ridge strap is standard professional practice.
Installation Do's and Don'ts
The DO’s:
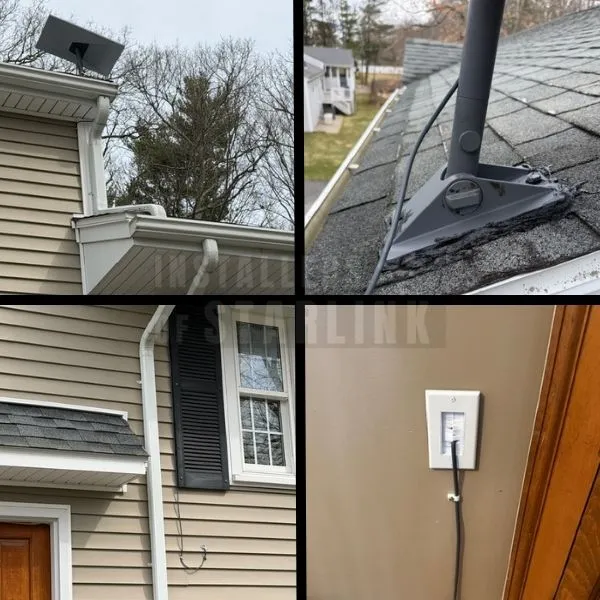
Do use self-leveling roofing sealant on every penetration. Products like Geocel 2315, Vulkem 116, or M-1 Structural Sealant are designed to stay flexible through extreme freeze-thaw cycles. Apply sealant generously into the pilot hole, under the flashing plate, and over the base of any lag bolt.
Do use appropriate sealant for wall penetrations. When routing the Starlink cable through an exterior wall, seal the entry point against water and air infiltration. Silicone caulk works on painted wood; butyl tape plus silicone works on metal siding.
Do use cable clips throughout the entire run. Cable clips should be placed every 12 to 18 inches along horizontal and vertical runs. This prevents the cable from sagging, flapping violently in the wind, chafing against sharp roof edges, and eventually shorting out.
Do plan your exact cable path before mounting. The Standard Starlink Gen 3 / Standard 4X kit includes a cable that is exactly 15 meters (49.2 feet) in length. While 50 feet sounds like plenty, it gets eaten up rapidly when routing down a roof pitch, along soffits, and through exterior walls. You cannot splice this proprietary cable. Always measure your intended run. If it exceeds 50 feet, you must order the official 150-foot replacement cable before installation.
The DON’Ts:
Don’t skip the sealant on any roof penetration—ever. Unsealed lag bolts are the number one cause of installation-related roof leaks. Water follows the bolt threads directly into your decking and attic, causing slow, highly expensive structural rot.
Don’t use indoor-grade clear silicone on a roof. Standard bathroom silicone is not rated for the brutal UV exposure and thermal cycling of a roof. It will crack and fail rapidly. Always use an exterior-rated polyurethane or polymer-based roofing sealant.
Don’t let the cable drape freely. Unsecured cable is a trip hazard and a chafe point. Route it cleanly along ridges, valleys, or fascia boards, and clip it securely.
Don’t assume your included cable is long enough. Again, the 49.2-foot cable is adequate for straightforward single-story installs, but for two-story homes or complex basements, it often falls short. Measure twice, drill once.
What Our Technicians Check Before and During Every Roof Installation
At Installers of Starlink, our process starts before our technician even arrives. During a complimentary virtual site survey, we review satellite imagery of your roof to assess pitch, likely obstructions, and optimal mount locations.
On installation day, we perform a full on-site evaluation:
A physical inspection of the proposed mount area for structural soundness.
An obstruction scan using the Starlink app to guarantee zero signal blockage.
Verification that the 49.2-foot cable is sufficient for the planned route.
Confirmation of the safest, cleanest wall entry point for the router.
Nothing is drilled, screwed, or mounted until we are 100% confident the location is flawless.
Let Us Handle It — Nationwide, Fast
If evaluating roof pitch, navigating metal seam clamps, and balancing on a ladder with power tools sounds like more than you want to take on, that’s exactly what we are here for.
Installers of Starlink provides professional Starlink installation services for residential, commercial, mobile, and marine customers from coast to coast. Our certified technicians carry a minimum of $1 million in liability insurance, have completed rigorous training specific to Starlink hardware, and bring the exact right tools and materials to your site.
Fast Scheduling: Our average turnaround time for booking is just 3 days.
Efficient Service: Installations are completed in an average of 3 hours or less.
Transparent Pricing: Residential installs start at just $385, with no surprise fees—ever.
Whether you have a standing seam metal roof, a steep-pitch shingle home, a commercial flat roof, or a remote cabin, we have the expertise to get you connected. We will assess your specific conditions, recommend the best mounting solution, and leave you with a clean, heavily weather-sealed installation you can count on for decades.
Ready to get scheduled? Call us at (877) 309-1050, fill out our free quote form or reach us via live chat—and expect a response in about 5 minutes. We’re available Monday through Friday, 6:00 AM to 11:00 PM, and weekends from 6:00 AM to 9:00 PM.
Connectivity News & Updates

Multi-Starlink Installation Complete at Streamside RV Park in Pulaski, NY
We’re thrilled to announce the successful completion of a multi-Starlink...

Starlink Installation in Henderson, NV: One Week or Less, From Green Valley to the Foothills
HENDERSON, NV — As Henderson holds its place among Nevada’s...

Starlink Installation in Los Angeles, CA: One Week or Less, From the Hills to the High-Rises
LOS ANGELES, CA — In most cities, a Starlink install...

How to Get Starlink Installation in Orlando, FL in One Week or Less
ORLANDO, FL — Getting connected in Central Florida no longer...