If you’ve been searching for a straight answer on what Starlink installation cost in 2026, you’re in the right place. Between Starlink’s own hardware pricing, third-party installation services, and a dozen mounting variables that change job to job, the numbers can feel all over the place online. Some sites quote you a low number that doesn’t include hardware. Others quote a high number without explaining why.
This post breaks it all down — what Starlink hardware costs directly from SpaceX, what professional installation costs, what makes a job more complex (and more expensive), and exactly what you get at our $385 starting price. No vague ranges, no fine print surprises.
What Does Starlink Hardware Cost?
Before talking about the Starlink installation cost, it helps to understand what you’re paying Starlink directly for the equipment itself. Hardware is purchased through your Starlink account at starlink.com and is separate from any installation service fee.
As of 2026, the Standard Starlink kit (the most common residential option, also called the Gen 3 Standard) is priced at $349 for the hardware bundle. This package includes the Gen 3 dish, the Gen 3 Wi-Fi router, a power cable, and the pre-terminated dish cable. Monthly internet service plans for residential customers typically start at $120/month, though pricing varies by your specific plan tier and region.
Starlink also offers higher-tier hardware options—including the Flat High-Performance dish and Priority service tiers—at significantly higher price points. These are primarily used by businesses, farms, mobile RVers, and high-demand users. If you haven’t purchased your kit yet and have questions about which hardware is right for your setup, our technicians are happy to walk you through it before you order to ensure you don’t overspend on hardware you don’t need.

How Much Does Starlink Installation Cost in 2026?
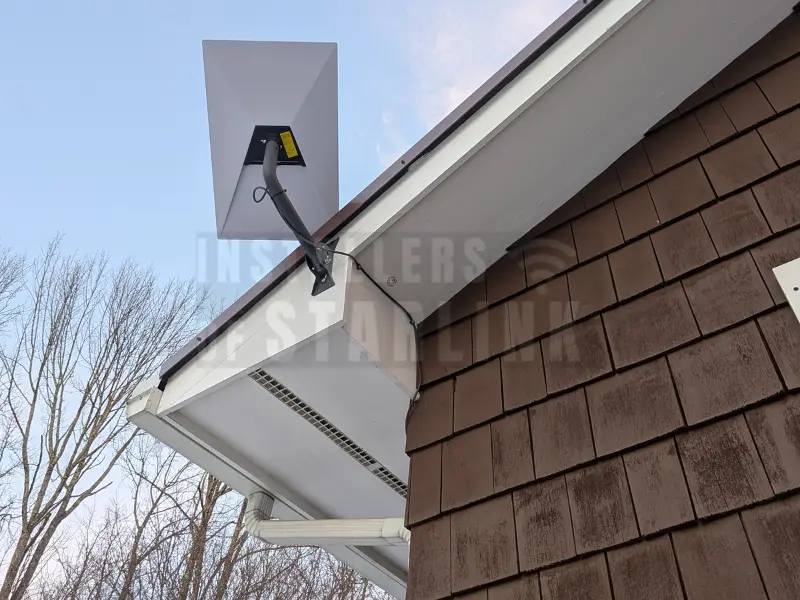
Here’s the number most people are actively searching for. Our professional residential Starlink installation cost starts at $385. That price covers the dish mounting, a complete cable run with proper weatherproofing at every entry point, and a full router setup—including speed testing and a walkthrough of the Starlink app before we leave.
There are no surprise fees added at the end. The quote you receive before booking is the final price, period.
Here’s a quick breakdown of our base pricing by service type:
Residential installs — Starting at $385.
Commercial/business installs — $750 per site (3 or more sites drop to $650 per site).
Mobile installs (RV, sprinter van, other vehicles) — Starting at $650.
Marine installs (yachts, boats, ships) — Starting at $750.
These starting prices reflect standard installs: a safe roof or wall mount, a clean cable run into the home or building, and a complete router configuration. Jobs that fall outside the standard scope are quoted upfront with a full explanation of what’s driving the additional cost.
What Factors Make Starlink Installation Cost More?
There are several legitimate approaches to getting a Starlink dish onto a metal roof securely. The right option depends on your roof profile, pitch, and how much drilling (if any) you want to do.
Complex Roof Types (Like Metal Roofs)
- Metal roofs are one of the most frequent reasons a job requires additional hardware. Standing seam metal roofs are actually ideal candidates for non-penetrating seam clamps (like those made by S-5!), which grip the raised seam of the panel with no drilling at all. Corrugated metal panels, however, may require penetrating standoff mounts anchored into the purlins below.
- This specialized, high-wind-rated hardware costs more than a standard roof mount, and the installation requires additional care, time, and advanced sealants. If you have a metal roof and want to understand the exact hardware we use, we covered this thoroughly in our guide to the Best Starlink Metal Roof Mount Methods That Actually Work.
Excessive Cable Runs
- The Standard Gen 3 Starlink kit includes a 15-meter (49.2-foot) pre-terminated cable. That cable cannot be cut and re-terminated without voiding the warranty and risking signal degradation. If the distance from your optimal dish location to your router exceeds 49.2 feet, a Starlink-compatible extension cable (available in a 45-meter / approximately 147-foot option) will be needed. Underground conduit runs for detached buildings, shops, or barns will also add significantly to the scope of work and the final quote.
Steep Pitches and Significant Height
- Roofs steeper than a 4:12 pitch or homes with unusually high rooflines—three-story homes, tall A-frame cabins, or steeply pitched agricultural buildings—require multi-person crews, roof walk boards, and full fall-arrest harness systems. That additional safety equipment and labor time is reflected in the quote.
Custom Interior Cable Routing (Wall Fishing)
- Most customers are happy with a clean exterior cable run secured neatly along the siding or soffit. But some prefer to have the cable completely concealed inside the walls—routed through the attic, down through interior wall cavities, and exiting cleanly at a wall plate near the router. This approach looks the cleanest of all, but it takes additional time and specialized wire-fishing tools. If this “hidden wire” aesthetic is a priority for you, let us know when requesting your quote.
Specialized Installation Costs: Commercial, RV, and Marine
You might notice that Mobile, Marine, and Commercial installs have higher starting costs. This is not an arbitrary upcharge; it reflects the vastly different technical requirements of these environments.
Commercial Installs ($750): Businesses often require flat high-performance dishes, complex network integrations (like load balancing Starlink with a backup fiber connection), and heavy-duty non-penetrating ballast mounts on flat TPO roofs.
RV and Mobile Installs ($650): Mounting a dish to a moving vehicle requires managing extreme vibration and wind loads. It often involves drilling through fiberglass, laying specialized Dicor lap sealants, and custom 12V DC power supply modifications so the Starlink runs off the RV’s battery bank rather than requiring an inverter.
Marine Installs ($750): Yachts and center consoles require 316-grade marine stainless steel mounts to prevent saltwater corrosion. Cables must be routed through watertight marine glands and tight fiberglass bulkheads, requiring a highly specialized skill set.
The Pros and Cons of DIY Installation vs. Hiring a Pro
Some Starlink customers consider doing the job themselves to save money. If you have a single-story home, an easy wall-mount location, and you are comfortable on a ladder, DIY is an option. However, it’s important to weigh the real pros and cons before breaking out the drill.
The Pros of DIY:
You save the $385 base installation fee.
You can complete the project on your own timeline.
The Cons of DIY:
High risk of severe injury from ladder falls, especially on slippery metal roofs or steep pitches.
High risk of causing thousands of dollars in water damage if the wrong sealant (like standard interior caulk) is used on a roof penetration.
You may void your hardware warranty if you accidentally crush or cut the proprietary shielded cable.
Without professional obstruction testing, the dish might be placed in a sub-optimal location, resulting in frequent Zoom meeting drops and gaming lag.
The Do's and Don'ts of Starlink Installation Costs
DON’Ts:
DON’T accept hidden fees. Beware of fly-by-night installers who quote a $150 starting price over the phone, but suddenly tack on “ladder fees” or “exterior routing fees” once they arrive in your driveway.
DON’T buy random third-party hardware to save a buck. Customers often spend $100 on an Amazon mount only to find out it isn’t structurally sound or won’t fit the Gen 3 mast, completely wasting their money. Rely on your installer to supply or recommend the correct, wind-rated hardware.
DON’T cut corners on cable extensions. Trying to manually splice a Starlink cable to save money on buying the official extension will almost always cause voltage drops and internet dropouts.
DO’s:
DO ask for a firm quote upfront. A professional installer should be able to give you a final price before they step foot on your property based on a few quick questions or photos of your home.
DO verify insurance. Only hire installers who carry full liability insurance. If a cheap handyman slips on your roof or accidentally drills into an attic water pipe, you want to make sure you aren’t the one footing the repair bill.
DO factor in your own time. Your time has immense value. Spending six hours watching YouTube tutorials, driving to the hardware store for the right lap sealant, and wrestling a ladder is often far more “costly” than hiring a professional to do it perfectly in three hours.
Frequently Asked Questions About Pricing
Because every home is uniquely different, the physical mount hardware (J-mounts, pivot mounts, non-penetrating ridge mounts, etc.) is typically quoted based on what your specific roof or wall requires. We carry the top hardware and will include this in your exact quote.
No. Your installation fee is a one-time payment made to us for the labor and materials. Your only monthly fee going forward will be your monthly internet subscription paid directly to SpaceX/Starlink.
Absolutely. All of our installations are backed by a workmanship guarantee. Example: If a roof penetration we sealed begins to leak due to our workmanship, we make it right, immediately.
Skip the Guesswork — We'll Handle Everything
We’ve walked through a lot of detail in this post because we genuinely want people to understand what goes into a proper Starlink installation — especially on a metal roof, where the stakes of getting it wrong are higher. But the honest truth is that the fastest, safest, and most reliable path to a working Starlink installation is a professional one.
At Installers of Starlink (a DBA of Starlink Installation Techs LLC), we provide nationwide Starlink installation services for residential, commercial, mobile, and marine customers across all 50 states. Our certified and insured technicians handle the ladder work, the drilling, the sealing, the cable runs, and the configuration — and they do it in an average of 3 hours or less from start to finish.
We schedule fast, too. Our average scheduling time is 3 days from first contact to completed installation, even in rural and remote areas where other services can’t reach.
Residential installs start at $385 — no surprise fees, ever. The price you’re quoted is the final price.
Ready to get your Starlink installed the right way?
- Call us: (877) 309-1050
- Get a free quote form
Our team is available Monday through Friday 6 AM – 11 PM and weekends 6 AM – 9 PM. Reach us by phone, chat, email, or our online quote form — and expect a response within about 5 minutes.
Connectivity News & Updates

Starlink Installation Cost in 2026 – What You Actually Pay
If you’ve been searching for a straight answer on what...

Starlink for Businesses and Multi-Building Properties – Campus & Chain Solutions
In the modern commercial landscape, connectivity isn’t just an amenity—it’s...

T-Mobile SpaceX Starlink Usage: What T-Satellite Actually Lets You Do in 2026
T-Mobile SpaceX Starlink usage has gone from beta curiosity to...
T-Mobile Starlink Business Internet: SuperBroadband Explained
T-Mobile Starlink business internet officially became a real product on...